
How to Use a Magic Eraser Without Ruining Your Walls
Published on February 2, 2026
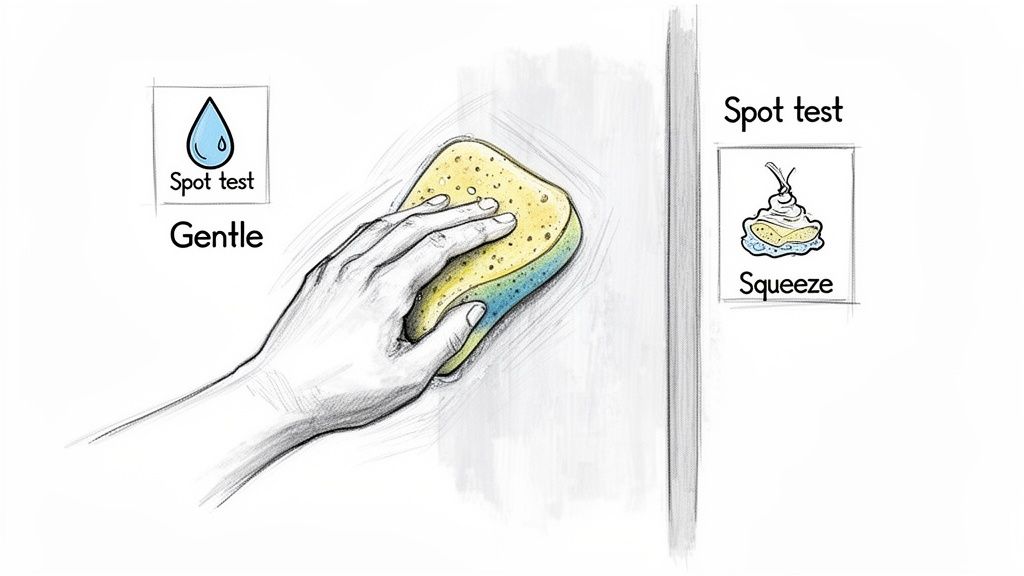
Before you grab that little white sponge and start scrubbing, let's cover the basics. The right technique is simple: just wet the sponge, squeeze out the extra water, and gently rub it on the surface. The key word here is gently.
Think of a Magic Eraser as a super, super-fine sandpaper. It works by abrasion, not chemicals. That’s why you always, always want to start with a light touch and test it somewhere inconspicuous first.
How Does a Magic Eraser Actually Work?
It might look and feel like a simple sponge, but a Magic Eraser’s cleaning power is all in its unique structure. It's made from something called melamine foam. When this foam gets wet, its microscopic structure becomes incredibly hard and abrasive, which is how it lifts away tough marks so easily.
The science behind it is pretty cool. Under a microscope, you'd see that the foam is made of countless tiny, hard, triangular fibers. When you add water, these fibers turn into powerful little scrubbers—almost as hard as glass—that physically scrape away stains from surfaces. This physical action is what makes it so different from a chemical-based cleaner. If you want to dive deeper, you can learn more about this fascinating process.
Why a Gentle Touch is Non-Negotiable
Because the Magic Eraser is an abrasive, going too hard can definitely cause damage. Our cleaning teams have seen it happen in homes all over the Portland area—from a dull, hazy spot on semi-gloss kitchen cabinets in Beaverton to a completely stripped finish on a baseboard in a beautiful Lake Oswego home. It’s an easy mistake to make if you're not careful.
To get a quick overview of the best practices, here’s a simple guide.
Magic Eraser Quick Start Guide
This table breaks down the core steps for using a Magic Eraser safely every time. Following these will help you avoid common pitfalls and protect your home's surfaces.
| Step | Action | Why It Matters |
|---|---|---|
| 1. Wet It | Always run the eraser under cool water before use. | Water activates the melamine foam and acts as a lubricant, significantly reducing the risk of scratching the surface. Never use it dry. |
| 2. Squeeze It | Gently squeeze out the excess water. Avoid twisting or wringing. | Twisting breaks down the delicate foam structure, causing the eraser to crumble and fall apart much faster. A gentle squeeze is all you need. |
| 3. Test It | Find an inconspicuous spot (like behind furniture or in a closet) and do a small test rub. | This is the most critical step. It confirms the eraser won't dull, discolor, or damage the finish on your specific surface. |
| 4. Rub Gently | Use light, circular motions on the stain. Let the eraser do the work. | Applying too much pressure is the number one cause of damage. Start softly and only increase pressure slightly if the stain isn’t lifting. |
By treating the Magic Eraser with a bit of respect for its power, you can tackle tough stains without creating a bigger problem.
Our Pro Tip: The most crucial step is to spot-test in a hidden area before tackling a visible spot. This non-negotiable rule has saved countless walls and countertops from unexpected damage. It's the one step our professional house cleaning crews never skip.
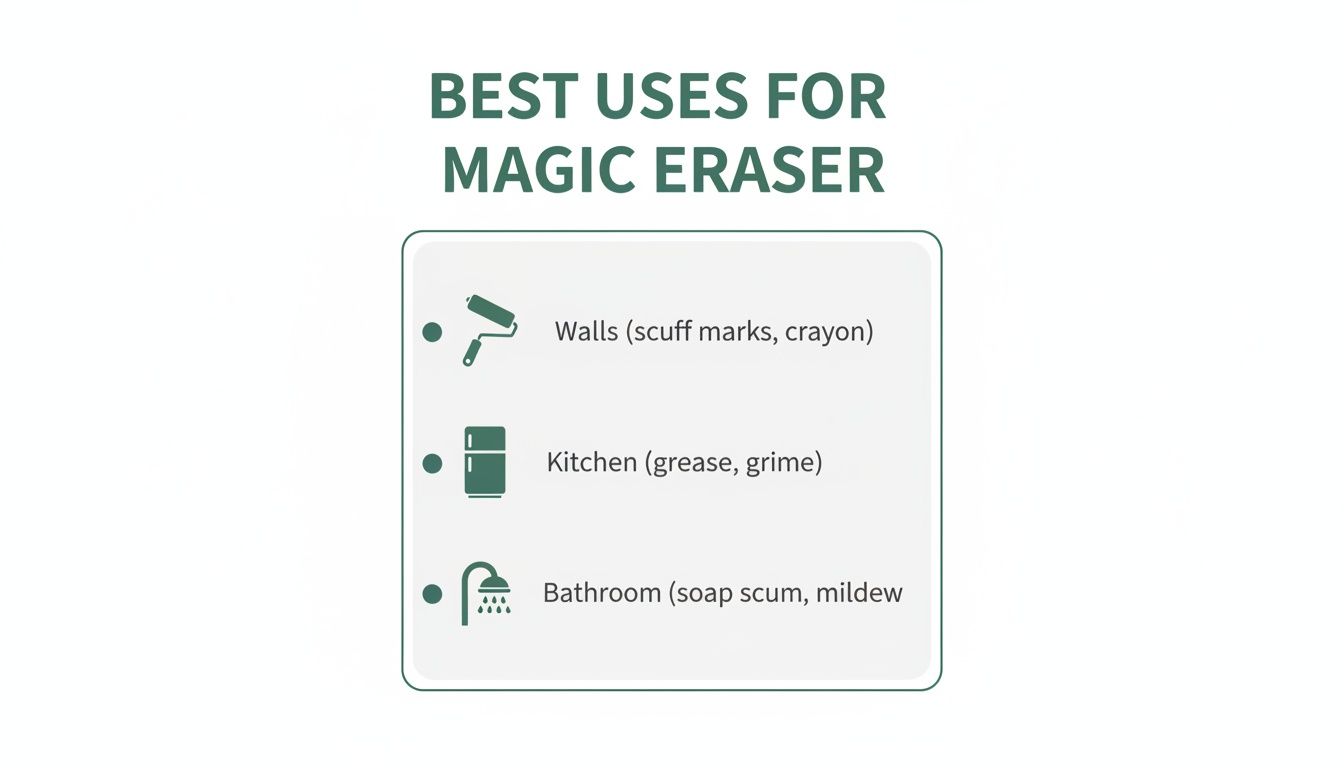
Surfaces Where Magic Erasers Truly Shine
Knowing how to use a Magic Eraser is one thing, but knowing where unlocks its real power. From our years providing professional house cleaning across the Portland metro area, we've learned these sponges are miracle workers for very specific jobs—especially those stubborn, isolated marks that normal cleaners just can't seem to touch.
Think about those annoying black scuff marks from shoes on your white baseboards and stair risers. A Magic Eraser can often make them disappear in seconds, bringing back the crisp, clean look of your trim. We also grab them for light switches and door frames, which are magnets for fingerprints and daily grime. A quick wipe-down can brighten them up instantly without resorting to harsh chemicals.
Walls and Trim
Painted walls are probably the number one reason people reach for a Magic Eraser, but you have to be careful here. They perform best on matte or flat paint finishes, which tend to grip onto scuffs and dirt more than their glossier counterparts. Use a feather-light touch to lift crayon masterpieces, furniture scuffs, and all those other mysterious smudges you find in hallways or kids' rooms.
When it comes to trim, they are an absolute game-changer.
- Baseboards: Effortlessly removes scuffs from vacuums, shoes, and furniture.
- Door Frames: Cleans off the grimy buildup that always seems to gather around handles.
- Window Sills: Lifts away dirt and even light mildew stains from painted sills.
Want more tips for keeping your walls looking fresh? Check out our in-depth guide on how to remove stains from walls, which covers different techniques for various paint types.
Kitchen and Bathroom Hotspots
In the kitchen, a Magic Eraser is one of the go-to tools for our deep cleaning teams, especially in busy Hillsboro family homes. It can gently lift burnt-on splatters from a glass stovetop, erase coffee or tea rings from laminate countertops, and even scrub away those mystery food spills inside the refrigerator. Just remember to wipe the surface with a clean, damp cloth when you're done.
The bathroom is where it becomes a secret weapon against soap scum. We've used them to bring back the sparkle to glass shower doors in Pearl District apartments and cut through grime on fiberglass tubs and sinks. They are also fantastic for whitening tile grout lines that have turned dull and dingy over time. As always, the golden rule applies: start gently and test a hidden spot first.
Critical Surfaces to Avoid with a Magic Eraser
Knowing how to use a Magic Eraser is only half the battle; knowing where not to use one is just as critical. Their abrasive nature means they can easily cause permanent damage on the wrong surfaces—a costly mistake we’ve helped clients fix more than once during a routine home cleaning service.
The number one rule is to steer clear of anything with a glossy, polished, or delicate finish. Think high-gloss paint, sealed wood floors, or those shiny stainless steel appliances. The eraser’s micro-scrubbing action physically sands down these finishes, leaving behind dull, hazy patches that are impossible to buff out. This is especially important during a move out cleaning in a Beaverton rental, where that kind of surface damage can quickly cost you your security deposit.
This handy visual highlights the best places for a Magic Eraser, focusing on the common areas like walls and kitchens where they truly shine.
Ready for a spotless home?
The main takeaway here is that these powerful sponges are best suited for durable, low-sheen surfaces you find all around the house.
The No-Go Zone: High-Risk Surfaces
Natural stone countertops are another surface you absolutely want to avoid. Materials like granite, marble, and quartz rely on a protective sealant to give them that beautiful shine and repel stains. A Magic Eraser will strip that sealant right off, leaving the porous stone underneath vulnerable to etching and permanent discoloration.
To make it easy, we've put together a quick-reference table based on our experience providing maid service in the Portland area.
Magic Eraser Safe vs Unsafe Surfaces
| Surface Type | Safe to Use (With Caution) | Avoid At All Costs |
|---|---|---|
| Walls | Matte or flat paint (spot test first!) | High-gloss, semi-gloss, or satin paints |
| Floors | Ceramic tile, vinyl, linoleum | Polished wood, sealed hardwood, laminate |
| Kitchen | Non-glossy countertops, sinks (not stainless) | Granite, marble, quartz, stainless steel |
| Bathroom | Grout lines, porcelain tubs, fiberglass showers | Polished fixtures, acrylic, custom glazes |
| Furniture | Some painted wood (if matte and tested) | Finished wood, veneers, antiques, leather |
| Exterior | Vinyl siding, outdoor plastic furniture | Car paint, glass, exterior window coatings |
This table isn't exhaustive, but it covers the most common household surfaces you're likely to encounter. When in doubt, a gentle approach is always the best one.
Here’s a quick-reference list of surfaces to keep these sponges away from:
- Polished Wood: This includes hardwood floors, finished furniture, and wood cabinets. The eraser will scratch the finish.
- High-Gloss Paint: It will create dull spots by removing the sheen. This also applies to semi-gloss and satin finishes.
- Stainless Steel: It can leave fine scratches on appliances, especially those with a shiny finish.
- Natural Stone: Marble, granite, and quartz will lose their protective seal.
- Car Paint: Never use an eraser on your vehicle's exterior; it will destroy the clear coat.
Always err on the side of caution. If you're unsure whether a surface is safe, it’s better to choose a gentler cleaning method. A small scuff is always better than a large, permanent patch of damage.
Pro Techniques for Stubborn Stains
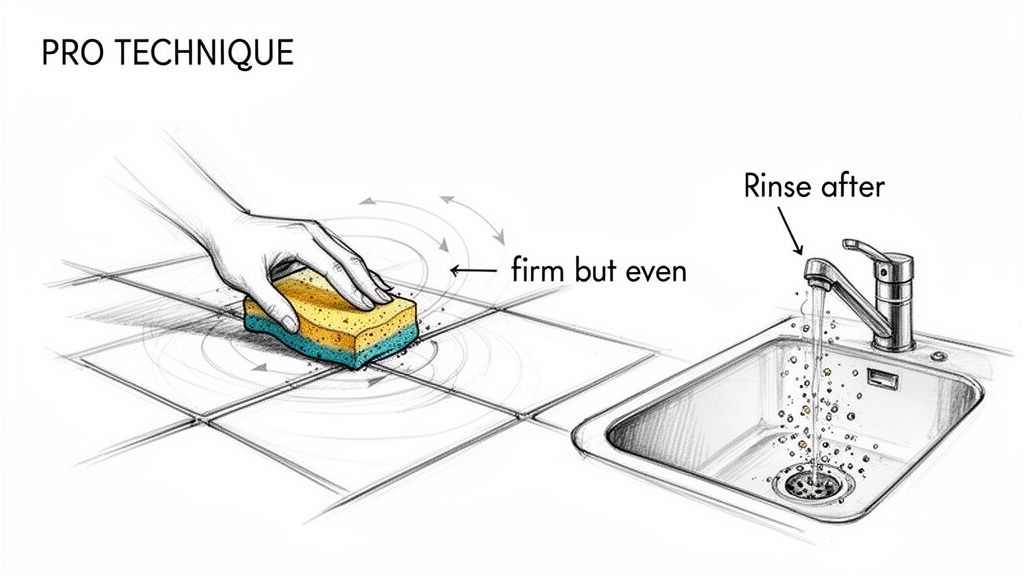
Some messes need a little more muscle than a simple wipe-down. When our cleaning teams tackle truly stubborn grime, like the buildup in the tile grout of a well-loved Portland kitchen, we switch up our technique. This is where you see the real magic happen.
The secret is all in the motion and pressure. For those tough spots, forget broad, sweeping strokes and instead use small, deliberate circular motions. This tactic concentrates the eraser's cleaning power right where you need it most. You’ll want to apply firm, even pressure—just enough to let the micro-scrubbers work, but not so much that you risk scuffing the surface.
Our Pro Tip: You'll notice the sponge starts to break down and crumble as you clean. That's a good thing! It’s a sign the melamine foam is working exactly as it should, breaking apart as it lifts the stain away.
Mastering the Final Steps
Knowing how to use a Magic Eraser also means knowing when to stop scrubbing. The second that stain disappears, you’re done. A common mistake we see homeowners make is over-scrubbing, which can dull the finish on a surface.
After you've lifted the stain, the final, non-negotiable step is to rinse the area thoroughly. Don't skip this part.
- First, grab a clean, damp microfiber cloth.
- Wipe down the entire area you just cleaned to pick up any residue.
- Rinse your cloth, wring it out, and wipe the surface one more time.
This last wipe-down is crucial. It removes any lingering microscopic melamine particles, leaving you with a truly clean, streak-free finish. It’s a small detail that makes a huge difference. If you're fighting marks that just won't budge, like hard water spots, our guide on how to remove water stains might offer the solution you need.
Eco-Friendly Swaps and When to Bring In the Pros
We get it. For many of our eco-conscious clients here in Portland, the idea of a single-use plastic sponge doesn't sit right. Magic Erasers work wonders, but they are a form of plastic, and as they wear down, they release microplastics into our waterways. This isn't just a vague concern; it's a real, measurable problem.
The numbers are pretty eye-opening. A 2024 study revealed that just one gram of used melamine foam can shed about 6.5 million microplastic fibers. When you think about how many of these are used globally, that adds up to potentially a trillion fibers entering the environment every month from a simple cleaning sponge. If you're curious about the science, you can learn about the study's findings here.
Great Sustainable DIY Alternatives
The good news is you can get that deep-clean feeling without the plastic waste. A couple of old-school household staples work incredibly well.
- Baking Soda Paste: Just mix baking soda with a little water until you have a thick paste. It’s a fantastic gentle abrasive for scrubbing sinks, countertops, and even buffing out some minor wall scuffs without harsh chemicals.
- Vinegar and a Microfiber Cloth: For anything greasy or grimy, like kitchen backsplashes or soap scum in the shower, a simple 50/50 mix of white vinegar and water is your best friend. Spray it on, let it sit for a minute, and wipe it away with a reusable microfiber cloth. It cuts through grime beautifully.
These simple solutions are perfect for everyday upkeep and tackling isolated spots. They're staples in any sustainable Portland household's cleaning arsenal for a reason!
When It's Time to Call Us
Of course, sometimes a DIY approach just won't cut it. If you're dealing with scuff marks in every room, stubborn stains that won’t budge, or you're facing a move-out clean in Beaverton, the job can quickly go from a small task to a massive project. That’s where calling for professional cleaning services can save your sanity.
Our Neat Hive crews come equipped with the professional-grade tools and experience to get your surfaces looking new again, without you having to worry about accidentally damaging your paint or finishes. For those bigger, more intensive jobs, our deep clean service can save you an entire weekend of scrubbing. You can learn more about what goes into a professional cleaning and how to deep clean a house to see if it’s the right call for you.
Questions We Hear All the Time About Magic Erasers
As a local maid service, we've seen it all when it comes to Magic Erasers. Our clients in Portland and Beaverton are always asking for our tips, so we’ve put together the answers to the questions we hear most often.
One of the biggest questions is whether you can pair an eraser with a cleaning spray. The short answer is no—just stick with water. These erasers work through a physical abrasive action, not a chemical one. Adding cleaners can damage the surface you're working on and sometimes even release harmful fumes.
How to Avoid Common Magic Eraser Mistakes
Have you ever cleaned a mark off your wall only to be left with a dull, matte spot? That's a classic sign of the eraser's micro-abrasives stripping away the paint's sheen. It's especially common on walls with a satin or semi-gloss finish.
This is exactly why we always preach the importance of a spot test and using a gentle touch. It’s the only way to avoid that dreaded patchiness.
So, when should you throw out your old eraser? It's time for a new one when:
- It's too small to get a good grip on.
- It starts crumbling or shredding while you clean.
- It simply stops lifting stains effectively.
Trying to squeeze the last bit of life out of a worn-out eraser is just not worth it. You'll work harder for worse results and end up with a mess of tiny white particles to clean up.
Are They Safe for Kids and Pets?
We get this question a lot from families, and it's a great one. While the melamine foam itself is non-toxic, the little bits that break off during scrubbing can be a choking hazard.
Always store your Magic Erasers where curious kids and pets can't get to them. After you've finished scrubbing, make it a habit to wipe the area down with a clean, damp cloth. This removes any leftover residue and makes the surface truly safe for everyone, whether they have two legs or four.
A quick final rinse is the key to a safe, spotless finish.
Sometimes a few scuffs are just the tip of the iceberg. If your home needs more than just a quick touch-up, the pros at Neat Hive Cleaning are ready to step in. Schedule your professional cleaning service today!
Ready for a spotless home?