
How to Remove Water Stains From Any Surface
Published on February 1, 2026
Getting rid of a water stain is often easier than you think. For light marks on wood, sometimes all you need is a little gentle heat from a hairdryer. For those stubborn hard water spots on glass, a simple white vinegar solution can dissolve them in minutes. The real secret is matching your method to the surface to avoid making the problem worse.
Understanding Portland's Pesky Water Stains
If you live in the Portland area, you're no stranger to water stains. From our misty mornings leaving spots on windows to hard water creating those dreaded white rings on coffee tables, these marks can really spoil the look of a clean home. This guide is all about practical, real-world solutions for the surfaces most commonly affected here in the Pacific Northwest.
We'll dig into why these stains happen in the first place, from the mineral deposits in our local water supply to simple spills left to sit for too long. Whether you're trying to save a delicate piece of wood furniture in your Lake Oswego home or de-cloud the shower doors in your downtown Portland apartment, our goal is to give you DIY methods that actually get the job done.
Why Water Leaves a Mark
It’s important to remember that not all water stains are the same. The kind of mark you're dealing with tells you a lot about how to tackle it. Here’s a quick rundown of what you’re likely seeing:
- Hard Water Stains: Those chalky, white spots on your shower doors and faucets? That’s classic hard water. Our local water contains minerals like calcium and magnesium. When the water evaporates, it leaves these crusty deposits behind.
- White Rings on Wood: This is probably the most common one. It usually means moisture is trapped in the finish of the wood, not deep in the wood itself. It's often caused by a sweaty glass or a hot pizza box placed directly on the surface. These are the easiest to fix.
- Dark Stains on Wood: A darker mark is a more serious issue. This tells you that water has seeped past the protective finish and soaked right into the wood grain. This requires a more intensive approach to fix.
- Yellow or Brown Ceiling Stains: This is the tell-tale sign of a water leak from above. The discoloration comes from minerals and whatever gunk the water picked up as it seeped through your drywall or plaster.
This simple decision tree can help you figure out the best place to start.

As you can see, the first crucial step is just figuring out if you're working with a hard surface or a soft fabric. Getting this right from the start saves a lot of headaches.
And this isn't a small problem—the global market for hard water stain removers has ballooned to USD 3.12 billion, with about 70% of homeowners reporting noticeable buildup on their home's surfaces. Leaving these stains untreated is more than just an eyesore; it can actually reduce a surface's lifespan by up to 40%. You can discover more insights about the hard water stain remover market and its impact online.
Quick Guide to Water Stain Removal by Surface
When you first spot a water stain, it's easy to feel overwhelmed. Where do you even begin? This table is your cheat sheet for the best first-line-of-defense for common household surfaces.
| Surface Type | Recommended First Step | Key Tool | Caution |
|---|---|---|---|
| Finished Wood | Gentle heat | Hairdryer on low setting | Keep the dryer moving to avoid heat damage. |
| Glass/Mirrors | Acetic acid solution | 50/50 white vinegar & water spray | Avoid getting vinegar on frames or surrounding surfaces. |
| Fabric Upholstery | Mild soap solution | Clean, damp cloth | Blot, don't rub. Check for colorfastness first. |
| Painted Walls | Diluted bleach solution | Sponge | Wear gloves and ensure good ventilation. Test on a hidden spot. |
| Tile & Grout | Baking soda paste | Old toothbrush or grout brush | Rinse thoroughly to prevent a hazy film. |
| Countertops (Sealed) | Mild dish soap and water | Microfiber cloth | Avoid harsh abrasives that can scratch the sealant. |
Think of this as your starting point. For many minor stains, these simple, gentle methods are all you'll need to restore your surfaces.
Getting Water Stains Out of Your Wood Furniture and Floors
Wood is a classic choice for homes everywhere, from Portland to Beaverton, but it has one big enemy: water. A leaky plant pot or a sweating glass can leave behind a dreaded water mark. The good news is, most of these can be fixed. First, you need to figure out what kind of stain you're dealing with.
Is it a light, cloudy ring? That means the moisture is just trapped in the finish—the protective top layer. This is a much easier fix. If you see a dark spot, however, the water has soaked past the finish and into the wood itself. That’s a tougher job, but not an impossible one.
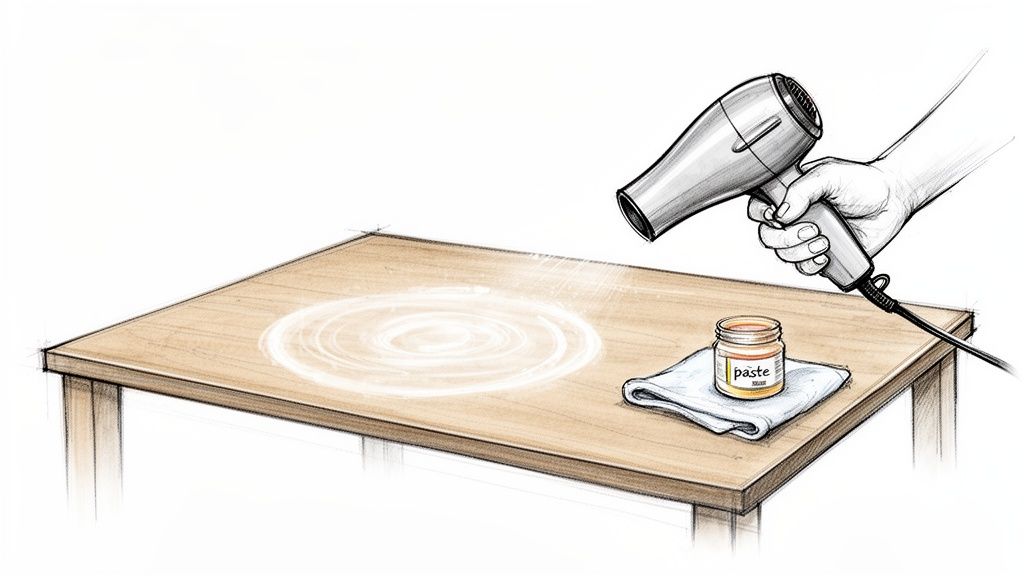
How to Handle Those Light, Cloudy Rings
When you spot one of those milky white stains on your coffee table, the goal is to gently coax the trapped moisture out of the finish. You can usually do this with things you already have around the house.
Here are a few methods our cleaning pros swear by:
- The Hairdryer: Grab your hairdryer and set it to low heat. Keep it moving a few inches above the stain to warm the area gently. You’re not trying to blast it with heat, just warm it enough for the moisture to evaporate. You'll see the ring start to fade.
- The Mayonnaise Method: This one sounds a bit odd, but it works. The oils in mayonnaise help displace the trapped water. Just put a small dollop on a soft cloth, rub it into the white ring, and let it sit for at least an hour. Then, just wipe it away.
- A Gentle Abrasive Paste: Mix equal parts baking soda and regular non-gel toothpaste. Apply the paste to a soft cloth and rub it gently onto the stain, always moving with the wood grain. The key here is gentle—you’re polishing the finish, not sanding the wood. Wipe the area clean with a damp cloth and dry it off.
A Word of Caution: Before you try any of these, test your chosen method on a hidden spot first, like the underside of a table. This little step can save you from accidentally damaging the finish.
Dealing with Dark Stains That Have Penetrated the Wood
A dark stain on your hardwood floor is a more serious issue. This tells you the water has gotten through the protective finish and has actually discolored the wood fibers. Fixing this takes a bit more elbow grease.
To get at the stain, you’ll first need to remove the finish from that specific spot. We typically use a fine-grade steel wool pad lightly dipped in mineral spirits to carefully strip away the topcoat. Once you're down to the bare wood, you can treat the discoloration.
Oxalic acid, sometimes sold as "wood bleach," is often the best tool for the job. It works by reversing the chemical reaction that caused the dark stain in the first place. Once the stain is gone and the wood is completely dry, you'll need to lightly sand the spot to blend it with the surrounding area, re-stain it to match the color, and then seal it with a matching finish.
If you're fighting these spots, you're not alone. Water stains are a huge headache for homeowners, fueling a global stain remover market worth nearly USD 25 billion. Homes account for a massive 57.80% of that market, with people spending tons of time trying to get rid of stubborn marks. Interestingly, a simple DIY paste of baking soda (3 parts) and water (1 part) with a little lemon juice can often dissolve 90% of mineral bonds in just 5-10 minutes. It's a massive industry, and you can learn more about the growing stain remover market to see just how common this problem is.
Restoring water-damaged wood takes patience, but with the right approach, you can erase those marks and bring back the beautiful, natural look of your furniture and floors.
Removing Water Marks From Fabric Upholstery and Carpets
It’s always a little frustrating to find a water ring on your favorite armchair or right in the middle of the living room carpet. It’s just water, so what’s the big deal? The truth is, that pesky ring isn't from the water itself but from the mineral deposits and dirt it leaves behind as it evaporates. We see this all the time in Hillsboro homes where furniture and carpets are part of a busy family life.
For any fresh spill, the most important thing to do is act fast. Grab a clean, dry, white cloth and blot—don't rub! Press down firmly to soak up as much liquid as you can. Never rub the spot, because that just pushes the minerals deeper into the fibers and can turn a small spill into a major headache.
Tackling Set-In Stains on Upholstery
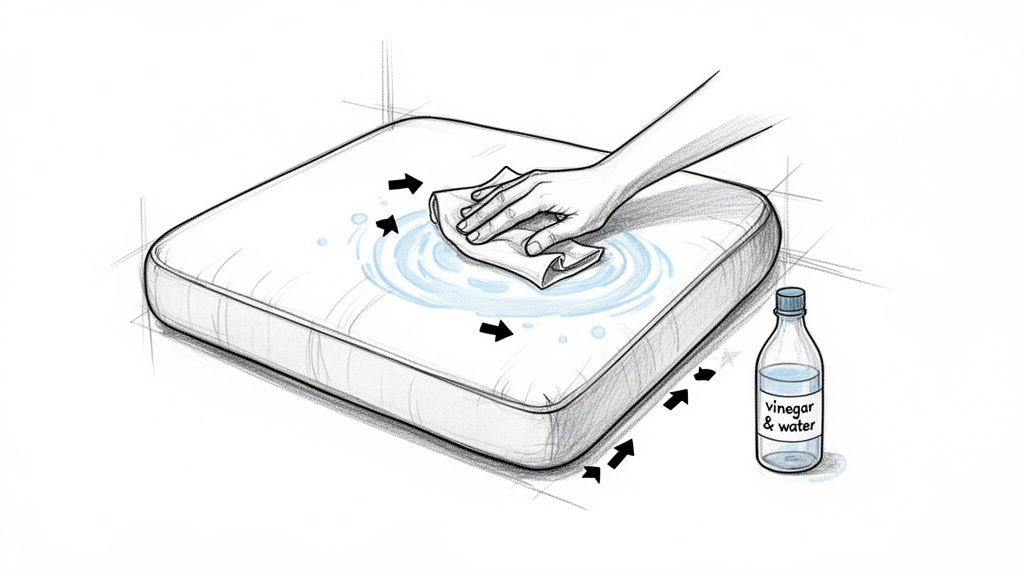
If the stain has already dried, the game plan changes slightly. You need to re-wet the area to dissolve the residue that created the ring, but this time with a liquid that won't leave its own mark.
A simple mix of equal parts distilled water and white vinegar works wonders. Using distilled water is non-negotiable here; it’s free of the minerals that caused the stain in the first place. The vinegar then gets to work breaking down those stubborn mineral deposits.
Here’s the right way to apply it:
- Get a clean, white microfiber cloth and lightly dampen it with your vinegar and water solution. You don’t want it dripping wet.
- Start blotting from the outside edge of the stain and work your way inward. This is the key to preventing the stain from spreading and creating an even bigger ring.
- Keep dabbing gently until the whole stain is damp.
- Finally, take a completely dry cloth and blot the area again to soak up as much of the cleaning solution as possible.
Addressing Deeper Stains in Carpets
Carpets can be a bit trickier. Their dense fibers love to cling to minerals and dirt, so you might need to be more persistent. The same vinegar and distilled water method often does the job, but it requires a bit more elbow grease.
A crucial step people often miss is the drying process. You have to get the spot completely and evenly dry. Any lingering moisture can lead to mildew, and that's a whole other problem you don't want. Use a fan or a hairdryer on a low, cool setting to speed things up.
For really tough or large water stains on a carpet, a steam cleaner can be your best friend. The hot vapor dissolves the mineral rings and lifts grime from deep in the pile without completely soaking the carpet.
Ready for a spotless home?
But if you’re looking at widespread staining or are worried about a delicate fabric, it’s smart to call in the pros. Sometimes, expert cleaning services are the only way to safely restore your upholstery or carpet. For more tips our teams use, check out our guide on effective carpet stain removal techniques.
Ultimately, getting water stains out of fabric is all about the right solution and, more importantly, the right technique. By blotting correctly and making sure the area dries thoroughly, you can keep your furniture and carpets looking great for years.
How to Clean Water Stains on Ceilings and Drywall
There’s nothing quite like that sinking feeling when you spot a yellowish-brown stain spreading across your ceiling. Here in the Portland area, our damp winters make this an all-too-common discovery, usually pointing to a slow leak from a roof or an upstairs pipe.
Before you even think about cosmetic fixes, you have to play detective. The absolute first step—and this is non-negotiable—is finding and fixing the source of the water. Just painting over a stain from an active leak is a recipe for disaster. It guarantees more significant problems, like mold growth and structural damage, down the road.
Preparing the Area for Treatment
Once you've had a professional handle the leak and you're 100% certain the drywall or plaster is bone-dry, it's time to tackle the stain itself. Taking a few minutes to prep the area properly will save you a massive headache later.
Start by protecting everything below the stain. Lay down plastic sheeting or thick drop cloths to cover your floors and any nearby furniture. Stain solutions can drip, and you don’t want to trade one cleanup job for another.
Next, get some fresh air moving. Open any windows and, if you can, set up a fan to keep the air circulating. The cleaning agents you'll be using can have strong fumes, so good ventilation is a must for your safety.
Applying the Stain Removal Solution
For most water stains on ceilings, a simple homemade solution is surprisingly effective. All you usually need is a mixture of one part household bleach to three parts cool water. This is typically strong enough to handle the discoloration without being overly harsh.
Here’s the process we've found works best:
- Gear Up: Safety first. Put on safety goggles to protect your eyes from splashes and rubber gloves for your hands.
- Mix Your Solution: Combine the bleach and water in a spray bottle or a small bucket.
- Apply Carefully: Lightly spritz the solution onto the stain, or gently dab it on with a sponge. You're just trying to dampen the stain, not saturate the drywall. Getting the area too wet can weaken the material itself.
- Let It Work: Now, just let the solution air dry completely. As it dries, you should see the stain begin to fade. If it’s a stubborn one, you might need a second light application.
Remember, the key is to apply the bleach solution lightly. Oversaturating the drywall can cause more damage than the original leak. A little patience goes a lot further than a heavy-handed approach.
If you're dealing with other marks on your walls, you can find more detailed advice in our complete guide on how to remove stains from walls.
When Painting Is Necessary
Sometimes, the bleach solution lightens the stain but doesn't make it disappear entirely. This often happens with older, deeper stains where minerals have seeped well into the paint and drywall. In these situations, priming and painting is the only way to get a flawless finish.
But don't just grab any can of paint. The minerals left behind by the water will often "bleed" right through a standard coat of latex paint, causing that ugly spot to reappear in a few weeks or months. It’s a frustrating cycle we’ve seen in many older Portland-area homes.
To stop the stain from coming back, you must use a high-quality, stain-blocking primer. These primers are specifically made to create an impenetrable barrier that seals the stain away for good. Apply one or two coats of a good oil-based or shellac-based primer, let it dry, and then you can paint over it with your ceiling paint, confident the stain is finally gone.
Making Glass, Tile, and Countertops Shine Again
Hard water is just a fact of life here in the Portland metro area. If you need proof, just look at your glass shower doors, tile, and countertops. Those chalky, white mineral deposits can quickly turn a sparkling surface dull and cloudy—it's one of the most common complaints we hear from clients in Beaverton and beyond.
Getting that shine back means you have to cut through some seriously stubborn calcium and magnesium buildup. Luckily, some of the best solutions are also the simplest and safest for your home. These are the very same principles our teams apply during a deep clean service to make kitchens and bathrooms sparkle without relying on harsh chemicals.
A Powerful Paste for Grimy Tile and Grout
Grout lines are porous and sit just below the tile surface, making them magnets for hard water residue and soap scum. Over time, this buildup can make even a spotless bathroom look dirty. Before you reach for an abrasive store-bought scrub, try creating a powerful, non-toxic paste instead.
Just mix baking soda with enough white vinegar to form a thick, fizzy paste. That bubbling reaction is what helps lift stains and dissolve the mineral deposits right off the surface. Grab an old toothbrush, work the paste directly into the grout lines and onto the tile, and let it sit for about 15 minutes. Then, rinse it all away with warm water to reveal much brighter, cleaner grout.
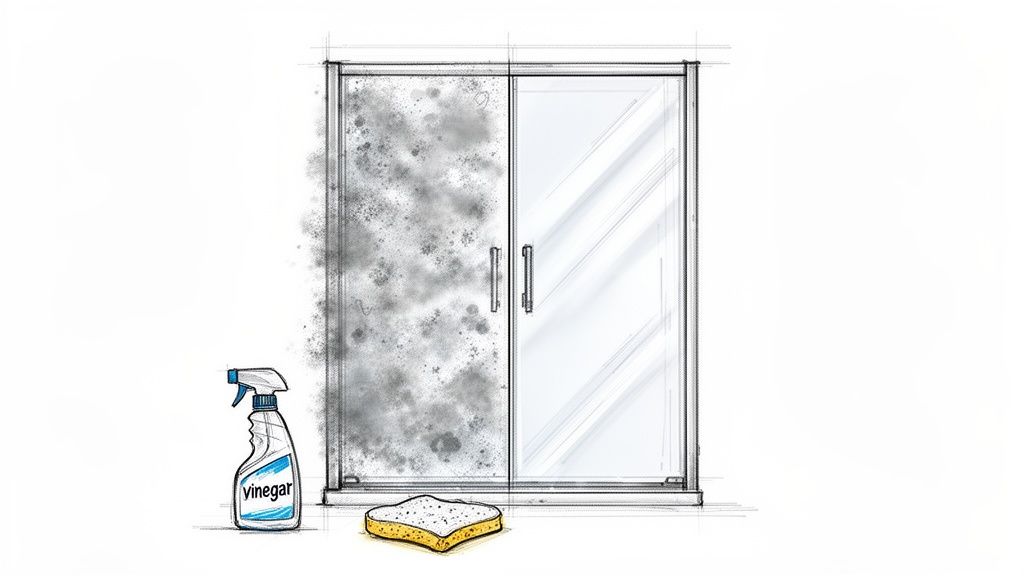
Clearing Up Cloudy Glass Shower Doors
Cloudy glass shower doors are probably the most obvious sign of hard water. The constant cycle of water spray and evaporation leaves behind layers of mineral film that can feel absolutely impossible to remove.
The secret weapon here is plain old white vinegar.
- Start by filling a spray bottle with a 50/50 solution of white vinegar and water.
- Spray the entire glass surface, making sure you really saturate the areas with the heaviest buildup.
- Let that vinegar solution sit for at least 10–15 minutes. This gives the acetic acid time to work its magic and break down the mineral deposits.
- Once it has soaked, give the glass a good scrub with a non-scratch sponge or a microfiber cloth.
- Finally, rinse the door with fresh water and use a squeegee to dry it completely for a perfect, streak-free shine.
This isn't just a local annoyance. The global market for water spot removers has exploded to USD 1.2 billion, with a reported 65% spike in stain complaints on home and car glass during summer peaks. Since hard water affects 85% of U.S. homes, it’s no wonder that 52% of city dwellers report battling mineral buildup every single week. In Portland's damp climate, these stains can actually etch surfaces, reducing their shine by as much as 35% in a single year if ignored. For stubborn buildup around faucets, a good lime-dissolving gel can remove up to 98% of deposits in just one go. You can read more about the growing demand for hard water stain removers and its causes.
Protecting Sensitive Natural Stone Countertops
While vinegar is a fantastic tool for glass and ceramic tile, it's a huge no-no for natural stone surfaces like marble, granite, or travertine. The acid in vinegar will permanently etch and dull the finish of these beautiful—and sensitive—materials.
For any stone countertop, you have to stick with a pH-neutral cleaner. Most of the time, a simple solution of warm water with a few drops of mild dish soap is all you need for daily cleaning. If you're dealing with tougher hard water spots on sealed stone, your safest bet is to use a dedicated pH-neutral stone cleaner.
If you have other tough kitchen stains, check out our guide on how to remove rust from a stainless steel sink.
Expert Tip: Never let spills sit on natural stone, especially acidic things like wine, coffee, or lemon juice. Wipe them up immediately. The longer they sit, the higher the risk of etching and staining, which often requires a professional to fix.
DIY vs Commercial Water Stain Removers
When you're faced with hard water stains, you have two main paths: mixing up a DIY solution from household staples or buying a commercial product. Both have their place, but it's important to know when to use each one.
Here’s a quick comparison to help you decide.
| Solution | Best For | Pros | Cons |
|---|---|---|---|
| Vinegar & Water | Glass, ceramic tile, porcelain, chrome fixtures | Inexpensive, non-toxic, readily available | Acidic; can damage natural stone and unsealed grout. Strong smell. |
| Baking Soda Paste | Grout, tough tile stains, porcelain sinks | Mildly abrasive for scrubbing, deodorizing, affordable | Can be messy to clean up; may not be strong enough for severe, old stains. |
| Lemon Juice | Glass, faucets, minor spots on tile | Natural, pleasant smell, effective on fresh stains | Acidic; poses the same risks as vinegar to sensitive surfaces. |
| Commercial Cleaners (Acidic) | Severe, old hard water buildup on non-porous surfaces | Very powerful and fast-acting on tough stains | Can contain harsh chemicals, requiring gloves and ventilation. Risk of damaging surfaces if used improperly. |
| Commercial Cleaners (pH-Neutral) | Natural stone (marble, granite), delicate surfaces | Safe for sensitive materials, specifically formulated for the job | More expensive than DIY options, may require more effort on heavy buildup. |
Ultimately, the best choice comes down to the surface you're cleaning and the severity of the stain. For everyday maintenance and light stains on durable surfaces, DIY solutions are fantastic. But for set-in stains or delicate materials like marble, a specially formulated commercial cleaner is the safer and more effective option.
Knowing When to Call a Professional Cleaning Service
While it’s fantastic to roll up your sleeves and tackle a water stain yourself, sometimes calling for backup is the smarter move. Knowing how to remove a fresh water ring is one thing, but recognizing when you’re outmatched by a stubborn stain is key to protecting your home’s most valuable surfaces.
There are certain situations that just demand more firepower than your pantry can provide. Think about the aftermath of a major leak, a deep, dark mineral ring on delicate antique furniture, or hard water buildup that’s practically become one with your unsealed grout. These aren't just cleaning jobs; they’re restoration projects where the wrong move could make things a whole lot worse.
When the Stain Is Too Tough for DIY
A professional house cleaning team brings an arsenal of tools and know-how that you just can’t get from a store shelf. We work with commercial-grade, pH-balanced cleaning solutions and specialized equipment—like high-powered steam extractors or orbital polishers—that can safely lift stains from materials that would be easily damaged by a DIY attempt.
Here are a few scenarios where it's best to call us in:
- Widespread Damage: If a burst pipe soaked a huge patch of your ceiling or warped a section of hardwood, a professional house cleaning service can tackle the entire affected area consistently and effectively.
- Delicate or Antique Surfaces: That vintage mahogany dresser with its original finish? Or the porous marble countertop you love? These require a deep understanding of how different materials react. The risk of causing permanent etching or discoloration is just too high to gamble on.
- Deeply Set-In Stains: Marks that have been sitting for months or even years have had plenty of time to bond with the surface. These often require a multi-step treatment process and specific chemical knowledge to break them down without harming the material underneath.
- Time-Sensitive Projects: When you need a massive job done right and done fast—like a full move out cleaning for your Beaverton apartment or prepping a rental property for new tenants—efficiency is everything. Our services can save you dozens of hours of scrubbing and deliver a result that’s guaranteed to impress.
A professional assessment isn't just about cleaning; it’s about protecting your investment. We can often spot underlying issues, like improper sealing on a countertop, that might be causing the stains in the first place, helping you prevent them from coming back.
The Value of a Professional Touch
Ultimately, the decision to call a home cleaning service is a balancing act between cost, time, and risk. For a simple water ring on your new coffee table, a quick DIY fix is probably all you need.
But for that pervasive, ugly stain that’s threatening the integrity and beauty of your home, bringing in a professional is an investment in your peace of mind. Our teams have seen it all, and we have the experience to get the job done right the first time, protecting the surfaces you love.
Your Top Water Stain Questions Answered
Here in Portland, we see our fair share of water-related issues, and that includes the stubborn stains left behind. Over the years, we've heard just about every question there is on the topic. Let's dive into some of the most common ones we get from homeowners.
Is One Cleaning Method Good for All Surfaces?
That’s a hard no. In fact, using the wrong method on the wrong surface is the quickest way to turn a small stain into a major repair job. You have to match your approach to the material.
Think about it this way: the white vinegar that works wonders on hard water spots on a glass shower door will permanently etch and dull a beautiful marble countertop. What works for a sealed hardwood floor in a Lake Oswego home could easily strip the delicate finish off an antique cherry wood table.
A Tip From Our Pros: Always—and I mean always—test your cleaning solution on a small, hidden spot first. Under a sofa cushion, on the back of a table leg, anywhere out of sight. This one simple step is what separates a successful DIY from a disaster.
What Are Those White Rings on My Wood Table?
You know the ones—those ghostly, cloudy rings that appear on your coffee table after a party. That’s actually moisture trapped in the wood's finish, not in the wood itself. This is good news! It means the damage is usually superficial.
It happens when something wet or hot, like a sweaty glass or a warm pizza box, sits on the table. The temperature change forces moisture into the top layers of lacquer or varnish. The trick is to gently draw that moisture back out. You'd be surprised what a hairdryer on low heat or even a dab of mayonnaise can do.
How Do I Stop Water Stains From Happening Again?
The best cure is always prevention. The secret is simply not letting water sit around on vulnerable surfaces.
- On furniture: Coasters are your best friend. Seriously. And wipe up spills the second you see them.
- In the bathroom: Keep a squeegee in the shower and give the glass a quick wipe-down after you're done. It takes 15 seconds and prevents nearly all mineral buildup.
- On ceilings: This one is non-negotiable. The moment you see a ceiling stain, your first call should be to a plumber or roofer to fix the leak at its source.
Regular cleaning also makes a huge difference. When you have a routine home cleaning service, you prevent the slow buildup of minerals that create those really tough, set-in stains in the first place.
When you've tried everything and that stain just won't budge, or you simply want it handled perfectly the first time, it's time to call in the pros. Neat Hive Cleaning has the expertise to restore your home's sparkle. Schedule your free estimate today!
Ready for a spotless home?